DragonTagsV2
DragonTagsV2 is a feature-rich tag plugin that offers the following benefits: - MySQL support for efficient and scalable data storage. - Unlimited tags for easy categorization and organization of data. - Unlimited pages for flexible and scalable content management. - Custom texture and model support for enhanced visuals and customization. - Placeholder API support for dynamic and flexible data placeholders. - Compatibility with most chat plugins (please contact support if you encounter any issues). - Hex color support for custom styling and design. - Permission-based access control for added security. - Owned tags category for personalized content management. - Random tag every time you chat (can be enabled/disabled in the configuration). - Highly customizable to fit your specific needs. - Easy-to-use interface for simple management of your tags and content.
Setup
Installing The Plugin
Download the plugin from BuiltByBit, then drop it in your server's plugins folder.
Making Your First Category
Our plugin uses the latest Minecraft material names to simplify material ID/name searches. The plugin supports all versions from 1.8 to the latest.
Assuming you have installed the plugin, we can now create our first category.
To make a new category is fairly simple just open your chat and type
/tag category <Tag Category name> <display name> <Material> <slot>
/tag category events &cEvents EMERALD 0After you have installed the plugin, you should be able to find your new category in plugins/DragonTagsV2/tags/events.yml. Note that the file name will be different depending on the chosen category name.
Creating Your First Tag
Before creating a tag, ensure you have already created a category.
Our plugin uses the latest Minecraft material names to simplify material ID/name searches. The plugin supports all versions from 1.8 to the latest.
Creating a tag is just as simple as making the category use command bellow
/tag create <category name> <tag display> <tag name> <material>Using the category created in the previous page
/tag create events &cExample example NAME_TAGOnce completed, a new tag file should be created in plugins/DragonTagsV2/tags/events/example.yml. You can create as many tags as desired.
Custom Textures
This chapter will provide instruction on how to incorporate custom textures into our plugin.
Adding custom heads to menu items
You can find custom heads here
You have to give the head an ID and add the Base64 string to the Skulls List
Skulls:
  - ID: "MANGO_ORB"
    Base64: "eyJ0ZXh0dXJlcyI6eyJTS0lOIjp7InVybCI6Imh0dHA6Ly90ZXh0dXJlcy5taW5lY3JhZnQubmV0L3RleHR1cmUvY2RmZDViZjFmZjA1NDMxNDdjOWQ2NGU2ODc2MWRiNmU0YjcxMzJhYzY1OGYwYjhmNzk4MzFmYWQ5YzI4OWVjYSJ9fX0="
  - ID: "PINK_ORB"
    Base64: "eyJ0ZXh0dXJlcyI6eyJTS0lOIjp7InVybCI6Imh0dHA6Ly90ZXh0dXJlcy5taW5lY3JhZnQubmV0L3RleHR1cmUvMTllY2JkY2I1NTQxMjNmYTRkMzE4NzY1MzhiYzdmYjI0NzQ5NGFlYTMyNWJkMjY1OTU2OTQ1MDVhZWJkMTBlZCJ9fX0="
To use them in your categories and tags you simply add the ID you entered as the Icon/Material
Adding custom textures/models
To use custom textures/models for a menu item you have to add it to your
We made it very simple just add bellow to any of the configs where you can specify a material/icon
Custom_Model_Data: MODEL_ID_HEREDepending on how you are managing the models and textures you will have a model ID i recommend using a manager like
Both of those plugins should have a command to get the Model ID of the Model you want shown, you can of course use any model manager you like or use none thats all up to you.
Placeholders
Chat Placeholders
Beyond their use in chat, PlaceholderAPI placeholders are also applicable in other contexts.
PlaceholderAPI
Requires PlaceholderAPI to be installed, you can find latest version here
%dragontagsv2_tag%Placeholders which should work with most chat plugins
{dragontagsv2_tag}Other Placeholders
PlaceholderAPI
Gets the raw name which would be what you named the file
%dragontagsv2_tag_name%Strips all colors from the tag
%dragontagsv2_tag_no_colors%Shows the amount of unlocked tags
tag_unlocked_amountDeveloper API
If you're looking for additional functionality from the Developer API, you can open a ticket in our Discord Server or send an email to support@insurgencedev.org to make a request.
PlayerCache
Simple API for getting players cached data
You can get the cache of player in a few ways not shown bellow, use DragonTagsAPI.# to see its options.
  public class Example extends JavaPlugin {

    public void onEnable() {
     String tagName = DragonTagsAPI.getPlayerCache(Insert_UUID_Here).tagName
     String categoryName = DragonTagsAPI.getPlayerCache(Insert_UUID_Here).tagCategory
     boolean randomTag = DragonTagsAPI.getPlayerCache(Insert_UUID_Here).randomTag
    }

    public void onDisable() {

    }

  }
Getting The Category Manager
To get the category manager is fairly simple
DragonTagsAPI.category.getCategoryManager().#It has multiple methods to get and register categories using that will also allow you to get the tags each category holds
Example Usage:
Getting all tags from all categories
Java Example
Map<String, TagCategory> categories = DragonTagsAPI.category.getCategoryManager().categories;
List<Tag> allTags = new ArrayList<>();
for (TagCategory category : categories.values()) {
    allTags.addAll(category.getTags());
}
Kotlin Example
val allTags = DragonTagsAPI.category.getCategoryManager().categories.flatMap { it.value.tags }Debugging
Information on how to enable debugging.
Using The Debug Section inside settings.yml
To utilize the Debug section in the settings.yml file, you need to add Debug sections. As of now, this feature is not yet available, but it will be incorporated in future releases.
Enabling Debug Mode
To enable debug mode, follow these steps:
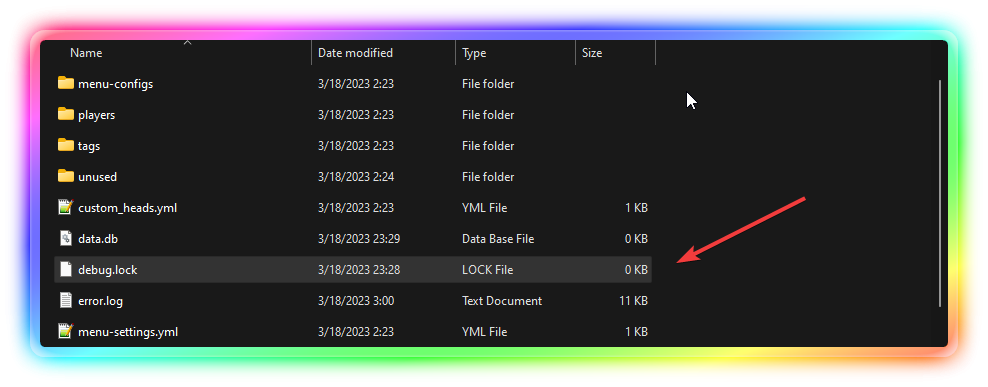
- Go to the folder where the plugin "DragonTagsV2" is installed. It is usually located in the "plugins" folder of your server.
- Inside the "DragonTagsV2" folder, create a new file and name it "debug.lock". Make sure to include the file extension ".lock".
- Once the "debug.lock" file is created, the plugin will be in debug mode.
Note that this file is only used as a marker to indicate that the debug mode is enabled. Deleting the file will turn off the debug mode.
After enabling the debug mode by creating the debug.lock file and restarting the server, you can use the /tag debug command to generate a debug.zip file. This file contains various logs and other debugging information that can be useful in troubleshooting issues with the plugin. You can then send this file to the support team for further analysis and assistance in resolving any issues you may be experiencing.